Image tutorial
Restore Old Photos with GPT Image 2: Scratches, Color and Clarity
An image-to-image restoration workflow with a complete prompt for repairing old photos while preserving facial features, composition and period details.
On this page
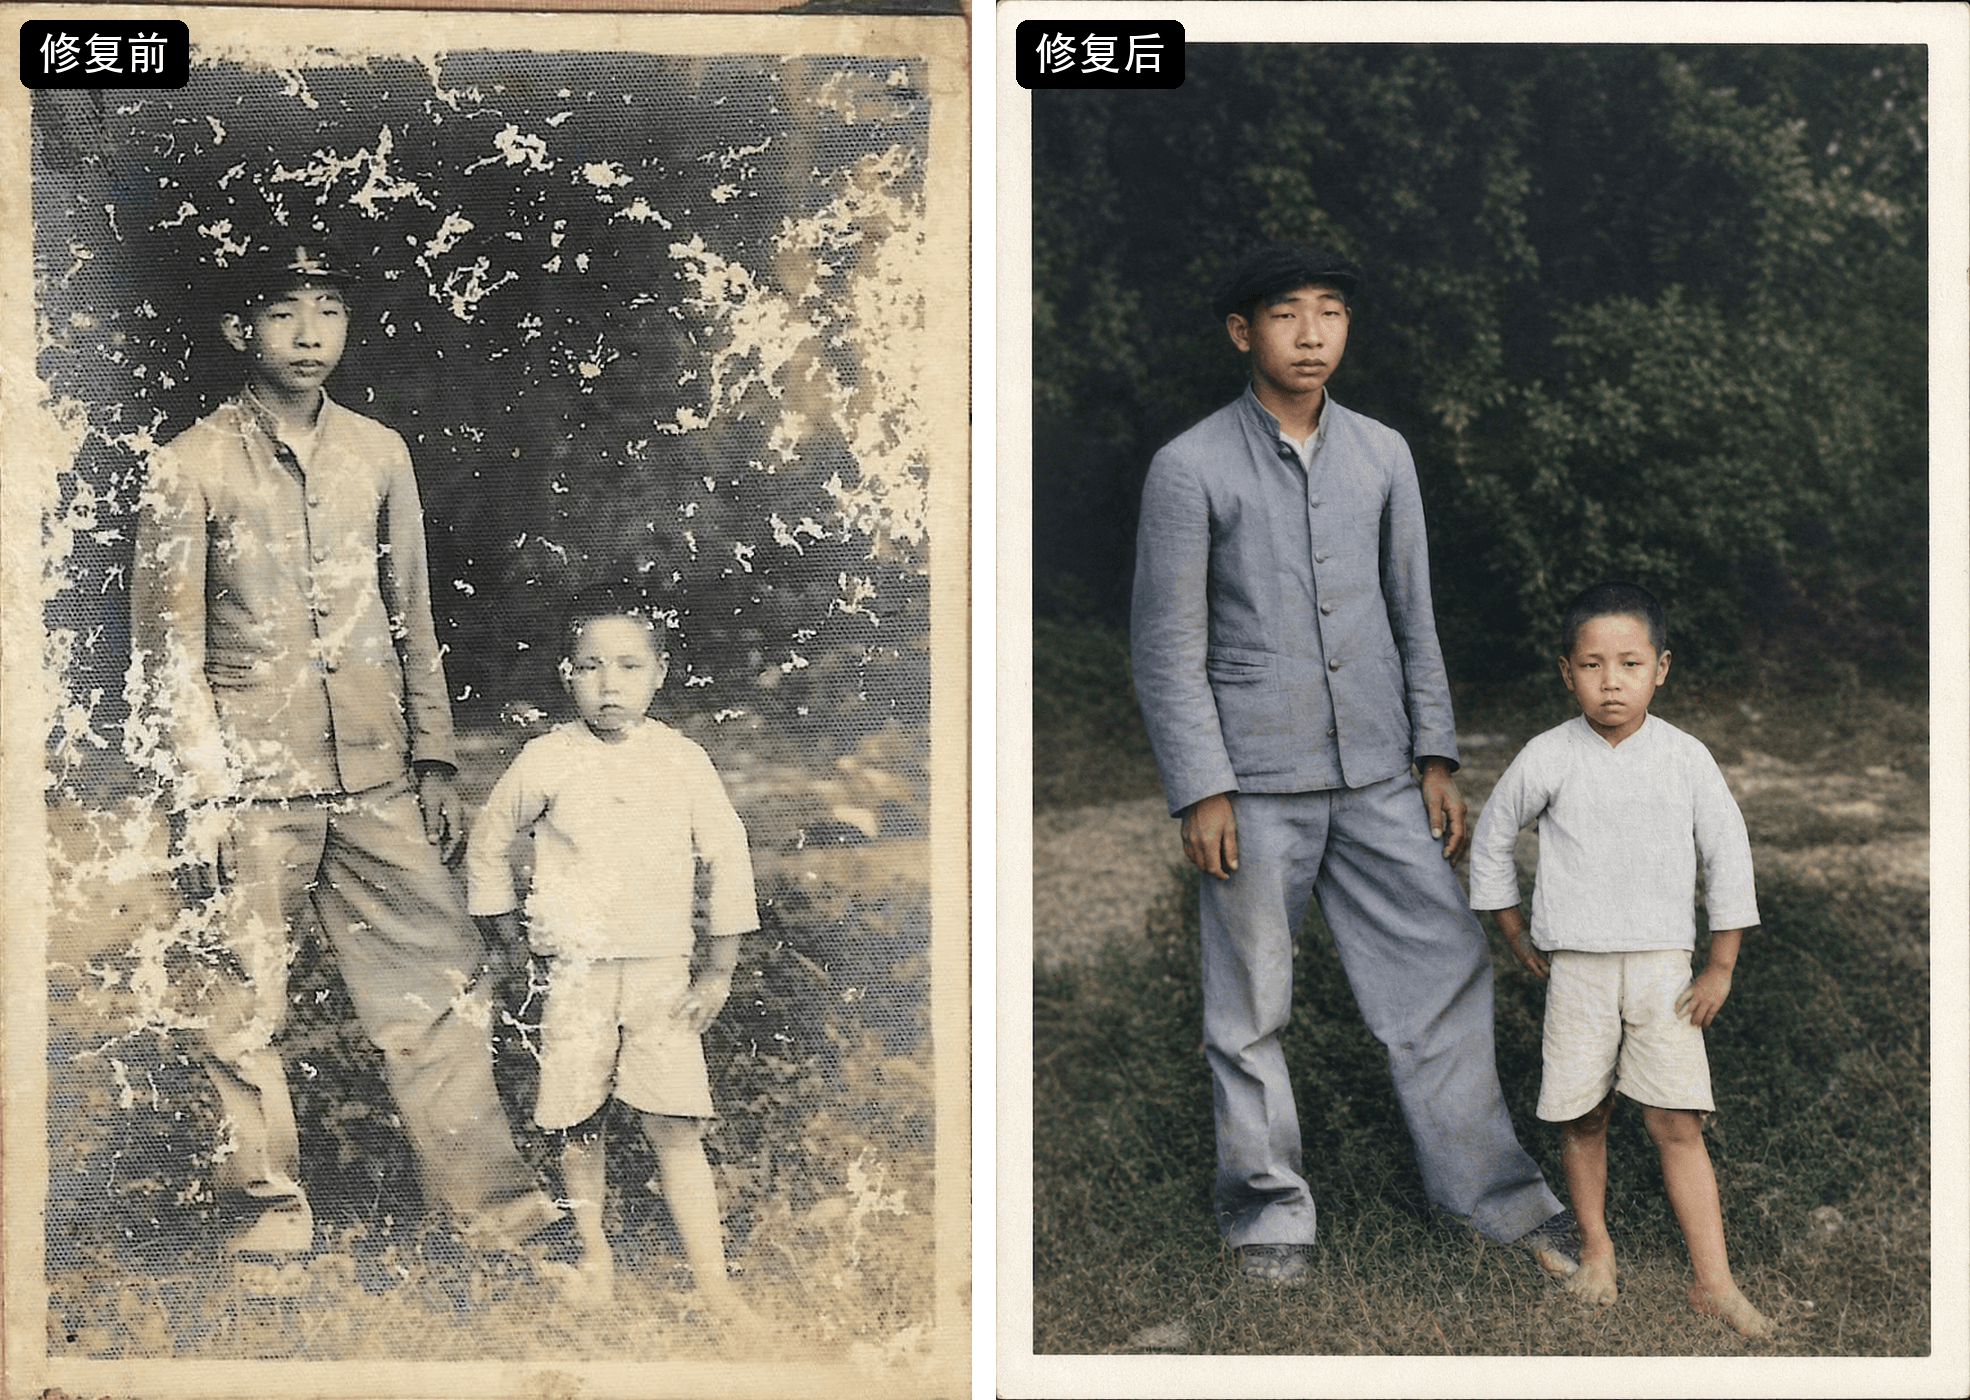
Old family photographs often combine several problems: scratches, creases, yellowing and blur. A black-and-white photo may also benefit from colorization. Manual repair takes time, but an automatic tool can introduce another problem—smoothing skin or changing facial features until the person looks different.
Image-to-image generation, including GPT Image 2, can help address several defects in one pass. Give it clear preservation instructions, then compare the output with the original.
Preserve the person before improving the picture
The person is usually the most important part of a family photo. A sharper face is not a successful restoration if the eyes, expression or proportions have changed.
Make the instruction explicit: repair the damage while preserving facial features and identity. Keep that requirement in every iteration.
Restore an old photo in three steps
1. Upload the original
Open the CVY.AI image generator, sign in and select Image to Image. Choose GPT Image 2 and upload the old photo. You can also compare results with Nano Banana or Seedream.
2. Use a complete restoration prompt
Describe both the repairs you want and the details that must remain. Adapt this template to the condition of your photograph:
Restore this old photograph with the following requirements:
- Remove scratches, creases and stains.
- Reduce noise and blur, and improve clarity.
- Correct yellowing and color casts. If it is black and white,
  colorize it naturally with skin tones, clothing and scene colors
  appropriate to the period. Avoid oversaturation.
- Preserve the person's facial features, expression and identity.
  Restore the photo without beautifying, slimming the face or
  changing the person's appearance.
- Preserve the period and setting: keep the existing clothing,
  hairstyles, furniture, background, signs, vehicles and recognizable
  objects. Reconstruct missing areas consistently with the original
  period, location and everyday context.
- Do not add elements that conflict with that period, region,
  identity or setting.
- For unclear hands, objects, backgrounds and missing areas, make
  conservative repairs based on visible evidence. Where the image
  gives insufficient information, keep natural softness or low
  detail rather than inventing specific objects.
- Keep the original composition and aspect ratio.
Why mention the period and setting? A model filling in a blurred object can default to a modern-looking item. Preserving visible details and asking for conservative reconstruction reduces that risk. This matters especially for very old or heavily blurred photographs.
3. Generate, compare and refine
Compare the result with the original. If the face has changed, strengthen the instruction to preserve its features and try another version. Check the background and objects as well as the main subject.
Adjust the prompt for the damage
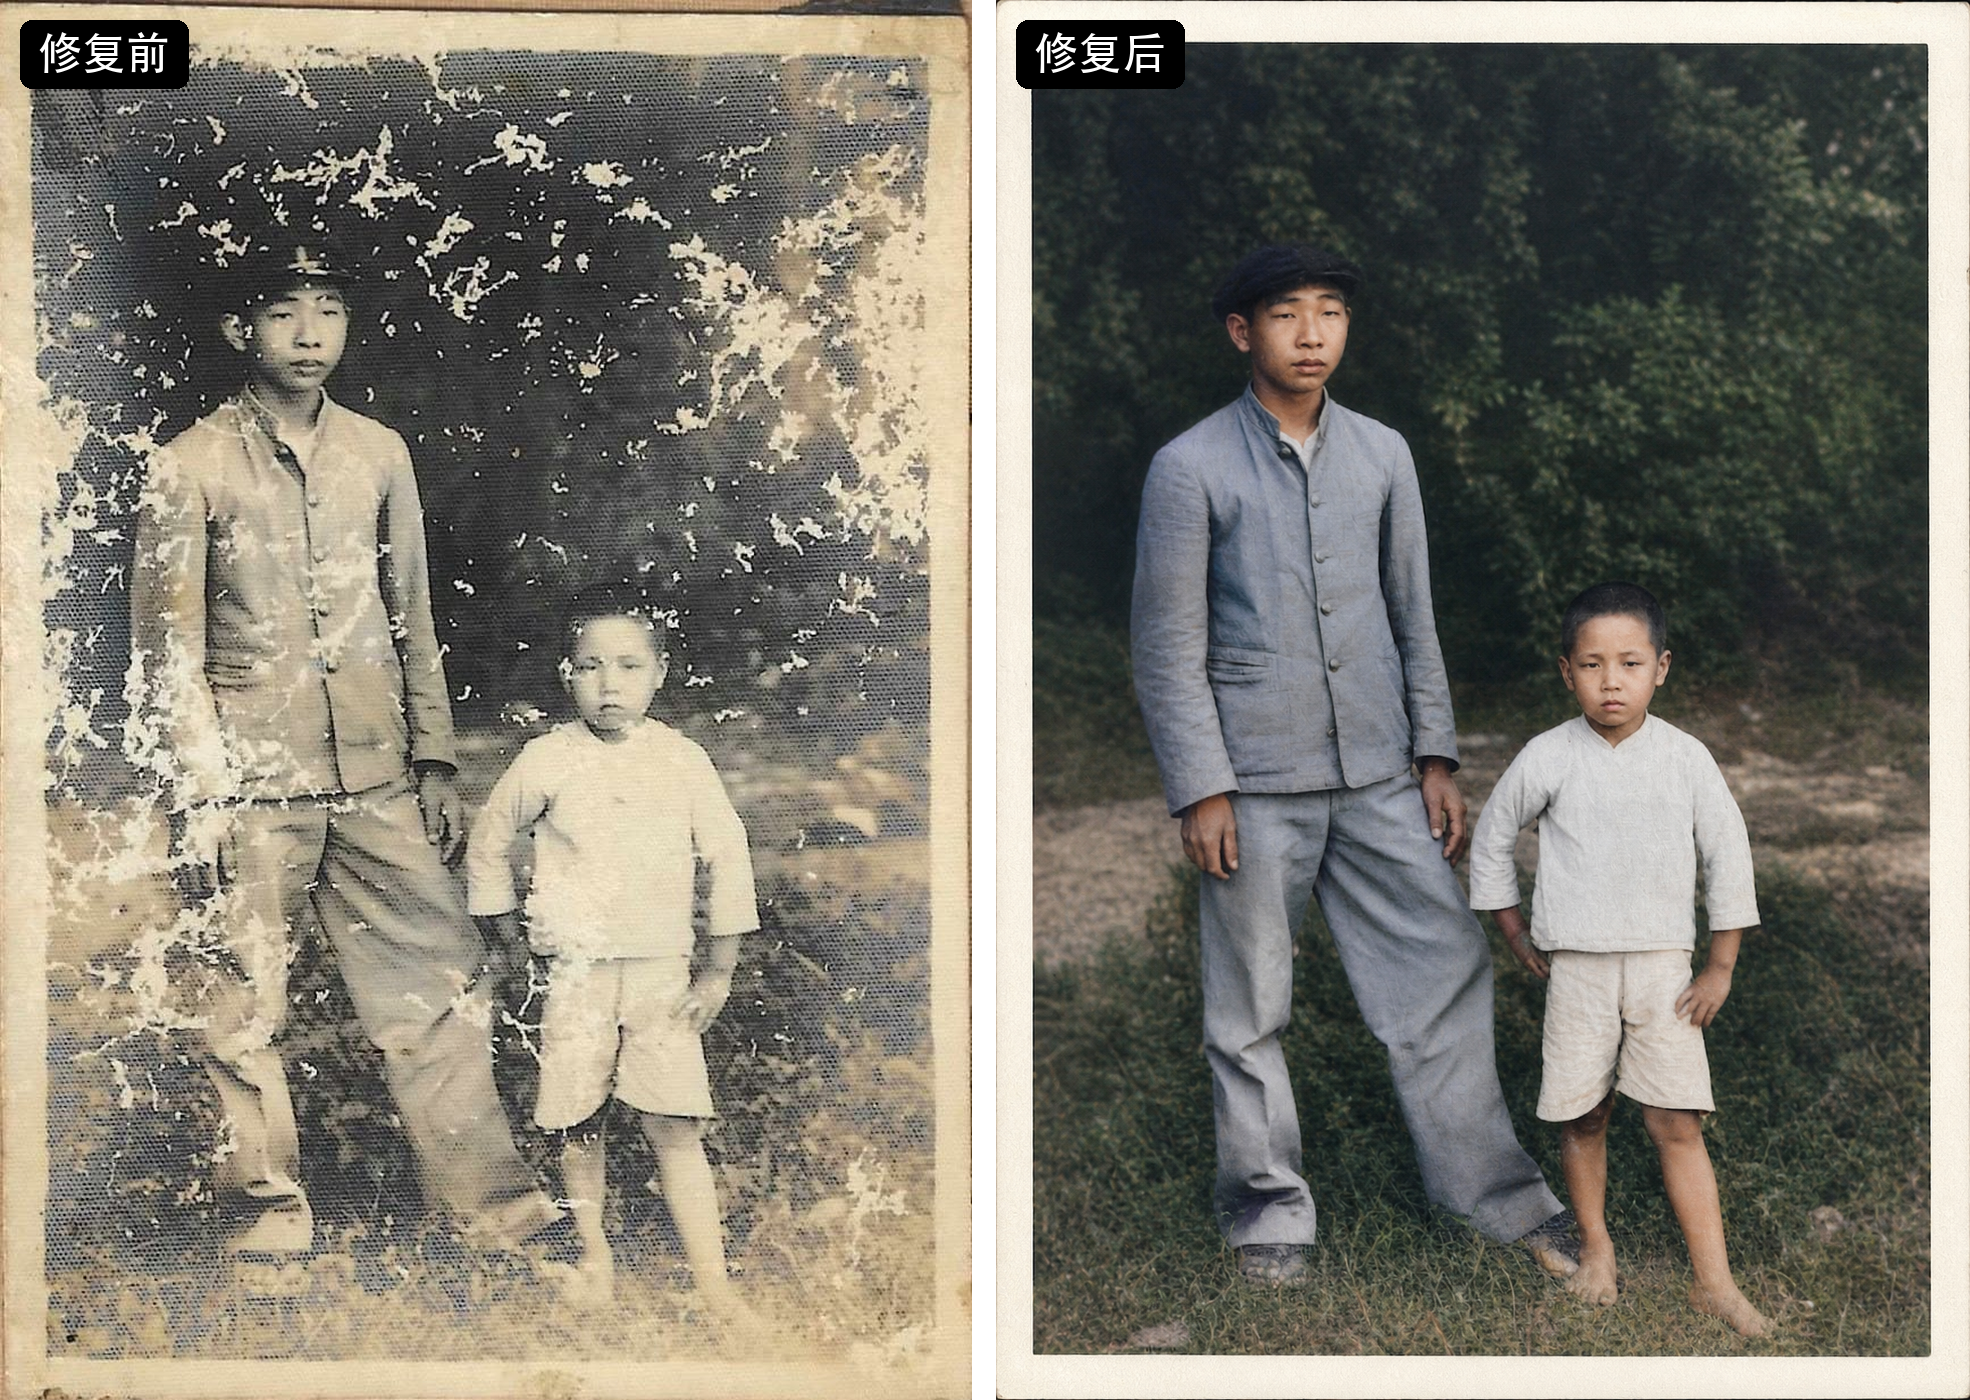
- Black-and-white colorization: ask for natural, period-appropriate colors and realistic skin tones. Avoid oversaturation.
- Heavy scratches, creases or missing corners: explicitly request removal of the damage and reconstruction of the missing area. Treat reconstructed details as model-generated estimates.
- Severe blur or low resolution: ask for clearer detail while preserving visible facial features. Emphasize that uncertain features should not be invented.
- Glare or a color cast from photographing a print: ask for color correction, glare reduction and correction of capture distortion.
Make the result more reliable
Work in stages when the source has many problems. First repair scratches and improve clarity; once that looks right, make a separate colorization pass.
Keep the original composition and aspect ratio in the prompt. Compare multiple results if necessary: identical instructions can produce different outputs.
Most importantly, AI restoration estimates missing information. It does not recover a historical record of details that are no longer visible. A restored image can be valuable for a family album, a print or a keepsake, while the original remains the reference for what the photograph actually contains.
The practical workflow is image-to-image plus a prompt that explains what to repair and what to preserve. Start with the template above, adjust it for your photo, and check the result against the source.
Original publication
Translated from the author's CSDN restoration tutorial.
- Old photo restoration
- GPT Image 2
- Image to image
Put your next idea into a picture.
Open the image generator with your own prompt, or choose an example to start exploring.
Open image generator